Wednesday, 25 January 2012

Fake Tim Tams or Chocolate Mousse Biscuits


Fake Tim Tams or Chocolate Mousse Biscuits


Inspired by:
Slice base from Gluten Free Baking Book by Simon and Alison Holst and Nigella Lawson’s Instant Chocolate Mousse

Why?
It’s Australia Day on the 26th of January, and so I wanted to make something that reminded me of Australia. TimTams are one of our famous biscuits- they involve, two chocolate malt biscuits with chocolate icing between them, covered in chocolate. Yum. Without the malt and the gluten and dairy to aid me.  . .here is my attempt!

Time Taken:
Mouse=20 mins, Biscuit base=40 mins, Chocolate=10 mins. 1 hr 10 mins.

Number of Dirty Dishes:
Saucepan, spoon, bowl, spoon, tray, bainmarie, spoon, knife

I used:
Base:
100g melted dairy free margarine
¼ cup castor sugar
1 cup gluten free flour
¼ cup cocoa

Mousse:
150g Gluten free marshmallows
1 Tbs of dairy free margarine (can substitute for oil)
250g dairy free chocolate (I used 40% cocoa solids)
¾ cup dairy free milk substitute
1tsp vanilla essence/powder.

Coating:
100g dairy free chocolate.

What I did:
Preheat oven to 180C and line 30cm x 40cm baking tray.
In a medium sized bowl combine the ingredients for the base (dairy free margarine, castor sugar, gluten free flour and cocoa) and mix well together. 
Pour out on to tray and with a spoon smooth onto the base of the tin so that the batter is evenly spread and is half a centimeter thick. 
Place in the oven and bake for 10 mins or until the centre is firm. (If a crunchy biscuit is desired pull base out of the oven and let cool for ten minutes and then rebake for another 10 minutes or until firm). 
Cut the base in half.

While the base cools combine mousse ingredients (marshmallows, dairy free margarine, dairy free chocolate, dairy free milk and vanilla), in a medium saucepan over a low heat. 
Stir mixture continually until marshmallows are melted, taking care not to boil the mixture. 
Let mixture cool for ten minutes and then spread over one half of the biscuit base and place the other half of the biscuit base on top of it so that the mousse is sandwiched between the biscuit layers.
After ten minutes cut the biscuits into thick fingers about 5cm long and 2.5cm wide and separate out on the baking paper.
Melt the remaining dairy free chocolate over a bain-marie, and once chocolate has liquidified pour it over the biscuits until they are covered. 
Once done, lift the biscuits off the paper slightly so that the chocolate runs underneath and coats the bottom of the biscuit as well.
Let the biscuits set, and enjoy.

Comments after eating fake Tim Tams:
Yum! Very chocolatey and delicious. Our friend who does not normally enjoy chocolate desserts liked them very much which was a big complement. Everyone was happy. Not exactly TimTams. . .but it satisfied my craving!

What I would do different:
I didn’t double bake the slice, and I would do that next time or use biscotti in an effort to make the biscuits more like Tim Tams which have that biscuit crunch. My crust was firm before I added the mousse and the chocolate, but when encased in chocolate and mousse, it soaked up the moisture and became more cake like than I desired. No complaints about the taste though!

Quick Chocolate Mousse


Quick Chocolate Mousse


Inspired by:
Nigella Lawson’s Instant chocolate mousse

Why?
It’s Australia Day on the 26th of January, and I wanted to make something that was “Australian.” The last time I had checked the shops, they did not have golden syrup so I could not make Anzac biscuits, and recently some dictionary has ascribed the Pavlova to New Zealand (although I am planning to make one next week for our next lot of visitors) so I thought I would try making fake Timtams! I’m using chocolate mousse for the chocolate icing inside them so I made a little extra for dessert.

Time Taken:
10 mins melting+ 10 mins cooling+ 20 mins refrigeration =40 mins.

Dirty Dishes:
Saucepan, spoon

I used:
150g Gluten free marshmallows
1 Tbs of dairy free margarine (can substitute for oil)
250g dairy free chocolate (I used 40% cocoa solids)
¾ cup dairy free milk substitute
1tsp vanilla essence/powder.

What I did:
Combine ingredients in a medium saucepan over a low heat. 
Stir mixture continually until marshmallows are melted, taking care not to boil the mixture. 
Let mixture cool for ten minutes, and then pour into serving dishes and refrigerate for 20 minutes. 
If desired, a teaspoon of mint or another essence can be mixed in before refrigeration to give the mousse another flavor. 
Serve and enjoy.

Comments after eating Quick Chocolate Mousse:
Delicious, we enjoyed it and so did our visitors. My husband said he liked it better than the other mousse and better than my chocolate brownie. . .which I can't remember him saying before.

What I would do different:
Next time I will ensure I stir on the bottom enough, as at the end I thought I had burnt it a little, but the chocolate had just congealed. I’d probably make more so I can eat it again as it serves 4-6 depending on portion size and so this time there wasn't too much left for the next day.

Dairy Free Caramel- the bane of my baking existance

It looks good doesn't it? Chocolate Caramel Slice. . .but it is very difficult to cut.
It is the latest of my experiments trying to make dairy free caramel that is suitable for slices or pies.
I've added coconut milk, and rice milk, and boiled for various temperatures, but somehow the caramel is still too hard. I'm guessing the magic number of cooking minutes and the mixture of ingredients will be discovered, on perhaps the tenth attempt, but until then let me know if you have any secrets!
I'm desperate for them!
Happy Experimenting!
(Below is a caramel pie- another attempt, the base was made from recycled gingerbread house)


Friday, 20 January 2012

Mint Chocolate Ice cream!


Mint Chocolate Ice cream!

Inspired by:
Sandy Parrott Ashbrook on Aprovechar’s Fresh Mint Ice cream Recipe and Jamie Oliver’s Pear Sorbet Recipe

Why?
Ice cream is my favourite food! I love Gelato/i because it tastes great and the fruit flavours (in real gelato- like here in Rome) are dairy free! It’s a blessing especially when I can’t indulge in the pizza and pasta!
My favourite flavor is Mint Choc Chip, which is not dairy free. I had a craving (perhaps because my brain tells me it should be summer even though it’s super cold here) and so I decided to experiment!

Time Taken:
10 mins to create the mixture. Several hours to freeze. I froze mine overnight. Using an ice cream maker the times will vary.

Dirty Dishes:
Heat proof dish (2L), medium saucepan, spoon.

I used:
250g icing sugar
1 can of coconut milk (400ml)
Peppermint essence (to taste)
Peppermint leaves (to taste- dried 2Tbs)
50g dairy free chocolate broken into chunks.

What I did:
Combine icing sugar and coconut milk in saucepan on medium heat. 
With a spoon stir until sugar is melted. 
If  using fresh mint leaves add them now and keep the mixture on low heat for several minutes to allow the flavor to develop. 
If using peppermint essence, add desired amount now and the dried peppermint leaves and stir in thoroughly.
After the peppermint flavour has been mixed through, taste the mixture (it will be hot!) to check the flavor, and add more essence or seep for longer if desired. 
Then bring to the boil, and boil for one minute. Remove from heat (turn off the element) and let mixture cool. 
When the mixture is still warm, but no longer boiling hot, add the chocolate chunks and give a brief stir. Some of the chips should melt. Pour the mixture into the heat proof dish until the mixture is completely cool. Then use an ice cream maker according to it’s instructions to complete the freeze process or to freeze it without an ice cream maker, put the ice cream mixture in the freezer. 
Mix every hour or two (if possible) for the first few hours to spread the chips around and to avoid any ice deposits.

After eating Mint Chocolate Ice cream:
I am wondering why I took so long to make it in the first place! The others who ate it enjoyed it too! Mmmmm mint.

Comments and what I would do different:
The ice cream doesn’t stay frozen for as long as traditional store bought ice cream. Once put into a bowl it gets quite melty around the edges. I’m not sure if there’s something I can do to combat this in my recipe (more sugar/longer boiling etc) or if that is a symptom of dairy free/preservative free ice cream or I need an ice cream maker. If anyone knows let me know! Until then I'm happy!

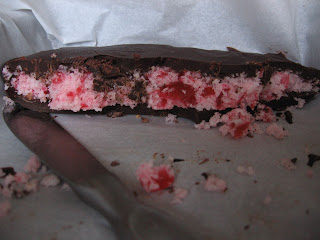
Cherry Ice Slice


Cherry Ice Slice
Inspired by:
Coconut Ice recipe I use at laurynlambert.blogspot.com and Cherry Ripe bars.

Why?
I can’t eat Cherry Ripe bars anymore, so for Christmas I thought I’d try making my version.

Time Taken:
10mins+15-30 mins refrigerator+10 mins+15-30 mins refrigerator= 40 mins-1 hour 20.

Number of Dirty Dishes:
Bain-marie, bowl, spoon, knife, chopping board, measuring cups.

I used:
100g 70% cocoa solids dairy free dark chocolate
100g  40% cocoa solids dairy free dark chocolate
½ cup icing sugar
4 tbs dairy free rice milk (can also use coconut other than soy or almond etc)
125g coconut
180g glazed cherries

What I did:
Line tray 20cm x 30cm. 
In a bain-marie melt 60g of each type of chocolate together, stirring with a spoon until chocolate is smooth. Once chocolate is melted, pour into the tray so that the chocolate lines the bottom of the pan. 
Put in the refrigerator for 15-30mins to set. 
On a chopping board cut glazed cherries into small pieces and then place them into a medium sized bowl. Add icing sugar, coconut and rice milk and mix until combined. 
Once the chocolate is set, pour cherry coconut mixture on top and press firmly on to the base. 
Put in the refrigerator while you melt the rest of the chocolate in the bain-marie. 
Once chocolate is melted, drizzle chocolate (I poured) over the cherry coconut layer and place in the refrigerator to set. 
Chop into pieces and enjoy.

After eating Cherry Ice Slice:
Delicious, it tastes great! My craving is satisfied and everyone liked it. I was very pleased with the result. It just needs a bit of tweaking to make it more friendly to cut.

Comments and what I would do different:
I would add some more cherries. Because of the chocolate base, this slice is difficult to cut, and falls apart, although it tastes great! Next time I might make them in ice cube trays or cupcake cases. Put some chocolate in first as the base, then the cherry, coconut layer and then a drizzle of chocolate. Once set then pop them out. I would hope then they would keep their form.