Showing posts with label slice. Show all posts

Monday, 12 November 2012

Coconut, Cranberry and Walnut slice


Coconut, Cranberry and Walnut slice

Inspired by:
Chocolate coconut slice- Australian Women’s Weekly

Why?
Wanted to take something for afternoon tea to my friend’s house.

Time Taken:
10 minutes preparation+20 minutes cooking=30 minutes

Dirty Dishes:
Tray, medium bowl, fork, spoon, measuring cups, measuring spoons

I used:
125g dairy free margarine (melted)
1 cup castor sugar
1 egg
1 tsp vanilla
1 cup self raising gluten free flour
½ cup desiccated coconut
½ cup dried cranberries
½ cup walnuts

What I did:
Preheat oven to 180C. 
Line 30cm x 20cm slice tray.
In a medium bowl mix margarine, sugar, egg and vanilla with a fork.
Once combined, add flour, coconut, cranberries and walnuts and mix well.
Pour into slice tray and bake for 20 minutes or until firm.
Let cool before cutting into slices.
Eat and enjoy.

Comments after eating Coconut, Cranberry and Walnut slice:
It’s a great combination of flavours and a tasty non chocolate slice.
My friends kept going back for more.

What I would do different:
I had a little less than ½ cup cranberries. I think adding more cranberries would be nice.

Friday, 29 June 2012

Coconut Lemonade Ice


Amazing Coconut Lemonade Ice


Inspired by:
Coconut ice and lemons

Why?
I had made some lemonade then got this crazy idea of making lemon coconut ice!

Time Taken:
10 minutes+ refrigeration

Number of Dirty Dishes:
Bowl, fork, tray, measuring cups

I used:
250g icing sugar
100ml of freshly squeezed lemon juice
Grated lemon rind (to taste)
250g desiccated coconut

What I did:
Line a 20cmx10cm tin and set aside.
In a medium bowl, combine icing sugar and coconut. 
Add lemon juice and zest and mix well with a fork.
Press mixture firmly into tin and refrigerate until set. 
Cut into squares and enjoy!

Comments after eating Coconut Lemonade Ice:
YUM! Tastes like lemonade but is in a slice. Delicious! Smells amazing too!

What I would do different:
Add a bit more icing sugar to help it set, or cut it into squares half way through setting to help it solidify.

Wednesday, 13 June 2012

Caramel Custard Slice


Caramel Custard Slice


Inspired by: Jodie’s Nanna, this caramel came out of her hand written recipe book and www.bakingmakesthingsbetter.com for the base.

Why? Caramel is my Achilles heel!

Time Taken: 10 mins+20mins=30 mins

Number of Dirty Dishes: saucepan, tray, spoon, measuring cups, 2 medium sized bowls, wooden spoon, fork, small bowl

I used:
Base:
150g room temperature dairy free margarine
½ cup sugar
1 ½ cups gluten free flour
¼ cup cocoa or ¼ cup dairy free chocolate chips
2-4 tablespoons of rice milk

Caramel Custard:
2 cups rice milk
1 cup brown sugar
1 Tbs dairy free margarine
1 Tbs corn flour
Yolks of 3 eggs
Pinch of salt
1 tsp of Vanilla


What I did:
Preheat oven to 180C, and line a 30cm x 20cm baking tin. 
For the base: in a medium bowl cream margarine and sugar together until well mixed. 
Sift in flour and cocoa or chocolate chips (I used chocolate chips) and mix well until combined. 
If the mixture is a little dry add 2-4 Tbs of rice milk to the mix (I did not find the rice milk necessary). 
Press mixture evenly into baking tin and bake for 20-25 minutes or until just firm.
For the Caramel Custard: in a medium saucepan heat rice milk on a low heat.
In a medium bowl combine corn flour, brown sugar, dairy free margarine, salt and vanilla. 
Whisk yolks together in a small separate bowl. 
Pour a little heated milk over the egg yolks and stir well. 
Add the heated milk and then the yolk mixture to the dry ingredients and mix well. 
Once combined, pour the mixture back into the medium sized saucepan and cook on a low heat, stirring until the Caramel Custard is thick. 
Take off the heat and leave to cool.
Leave base to cool before pouring Caramel Custard on top. 
Cut up and Enjoy!

Comments after eating Caramel Custard slice:
YUM! I wanted more of this. I haven’t eaten dairy filled Caramel for a long time, so I’m not sure if it tastes like real Caramel exactly, but it’s delicious!

What I would do different:
I might try adding more corn flour in the hope the caramel would solidify almost like Vanilla Slice.

Wednesday, 8 February 2012

Anzac Slice


Anzac Biscuits/Slice


Inspired by:
Family Circle Kids Cookbook Recipe

Why?
I continued the Australia Day celebrations from last week. We had more visitors from Australia come and stay and they had missed out on celebrating Australia Day. What better to cheer them up than some warm Anzac slice!?

Time Taken:
10mins +20 mins cooking

Number of Dirty Dishes:
Saucepan, wooden spoon, measuring cups, medium bowl, tray

I used:
1 ½ cups rolled oats (or rolled rice if oats isn’t in your gluten free diet)
1 ½ cups gluten free flour
2 tbs golden syrup
125g dairy free margarine or ¼ cup oil
3/4 cup sugar
1 tbs hot water
1tsp bicarb soda
*see what I would do different for the recipe with coconut

What I did:
Preheat oven to 180C and line 20cm x30cm baking tray. 
In a medium saucepan, melt dairy free margarine and golden syrup. 
In a cup mix hot water and bicarb soda and then add to the syrup, stirring well. 
Take off the heat (turn off the element). In a medium sized bowl mix together oats, sugar and gluten free flour. 
Pour syrup over the dry ingredients and mix well until combined. 
Pour into tray and flatten into the pan with the back of the spoon making sure the mixture is even. 
Bake for 20 minutes (it will be gooey/bubbling when it comes out of the oven), and then leave to set for 10 minutes before cutting.

Comments after eating Anzac biscuits/slice:
This slice is a winner with so many, which I am always surprised by that as I think it looks healthy (in a way that might make the eater think the biscuits are bland) because of the oats, and in general when it comes to dessert I find that friends don’t often choose the healthy looking option they choose the yummie looking option. I think the golden syrup gives them a delicious taste that not everyone, especially here in our international community is used to as It’s very easy, it’s vegan, and very delicious.

Comments/What I would do different:
Normally coconut is added to this recipe, but as I didn’t have it I added extra oats and flour. 
If you add 1 cup of shredded coconut, then only add 1 cup of rolled oats and 1 cup of gluten free flour. 
Normally this recipe is made as a biscuit/cookie not as a slice. I have had no success in getting my mixture to stay separate in the oven (perhaps a side effect of the dairy free part) and so I cut them into biscuit squares after it is cooked instead of despairing every time.


Friday, 20 January 2012

Cherry Ice Slice


Cherry Ice Slice
Inspired by:
Coconut Ice recipe I use at laurynlambert.blogspot.com and Cherry Ripe bars.

Why?
I can’t eat Cherry Ripe bars anymore, so for Christmas I thought I’d try making my version.

Time Taken:
10mins+15-30 mins refrigerator+10 mins+15-30 mins refrigerator= 40 mins-1 hour 20.

Number of Dirty Dishes:
Bain-marie, bowl, spoon, knife, chopping board, measuring cups.

I used:
100g 70% cocoa solids dairy free dark chocolate
100g  40% cocoa solids dairy free dark chocolate
½ cup icing sugar
4 tbs dairy free rice milk (can also use coconut other than soy or almond etc)
125g coconut
180g glazed cherries

What I did:
Line tray 20cm x 30cm. 
In a bain-marie melt 60g of each type of chocolate together, stirring with a spoon until chocolate is smooth. Once chocolate is melted, pour into the tray so that the chocolate lines the bottom of the pan. 
Put in the refrigerator for 15-30mins to set. 
On a chopping board cut glazed cherries into small pieces and then place them into a medium sized bowl. Add icing sugar, coconut and rice milk and mix until combined. 
Once the chocolate is set, pour cherry coconut mixture on top and press firmly on to the base. 
Put in the refrigerator while you melt the rest of the chocolate in the bain-marie. 
Once chocolate is melted, drizzle chocolate (I poured) over the cherry coconut layer and place in the refrigerator to set. 
Chop into pieces and enjoy.

After eating Cherry Ice Slice:
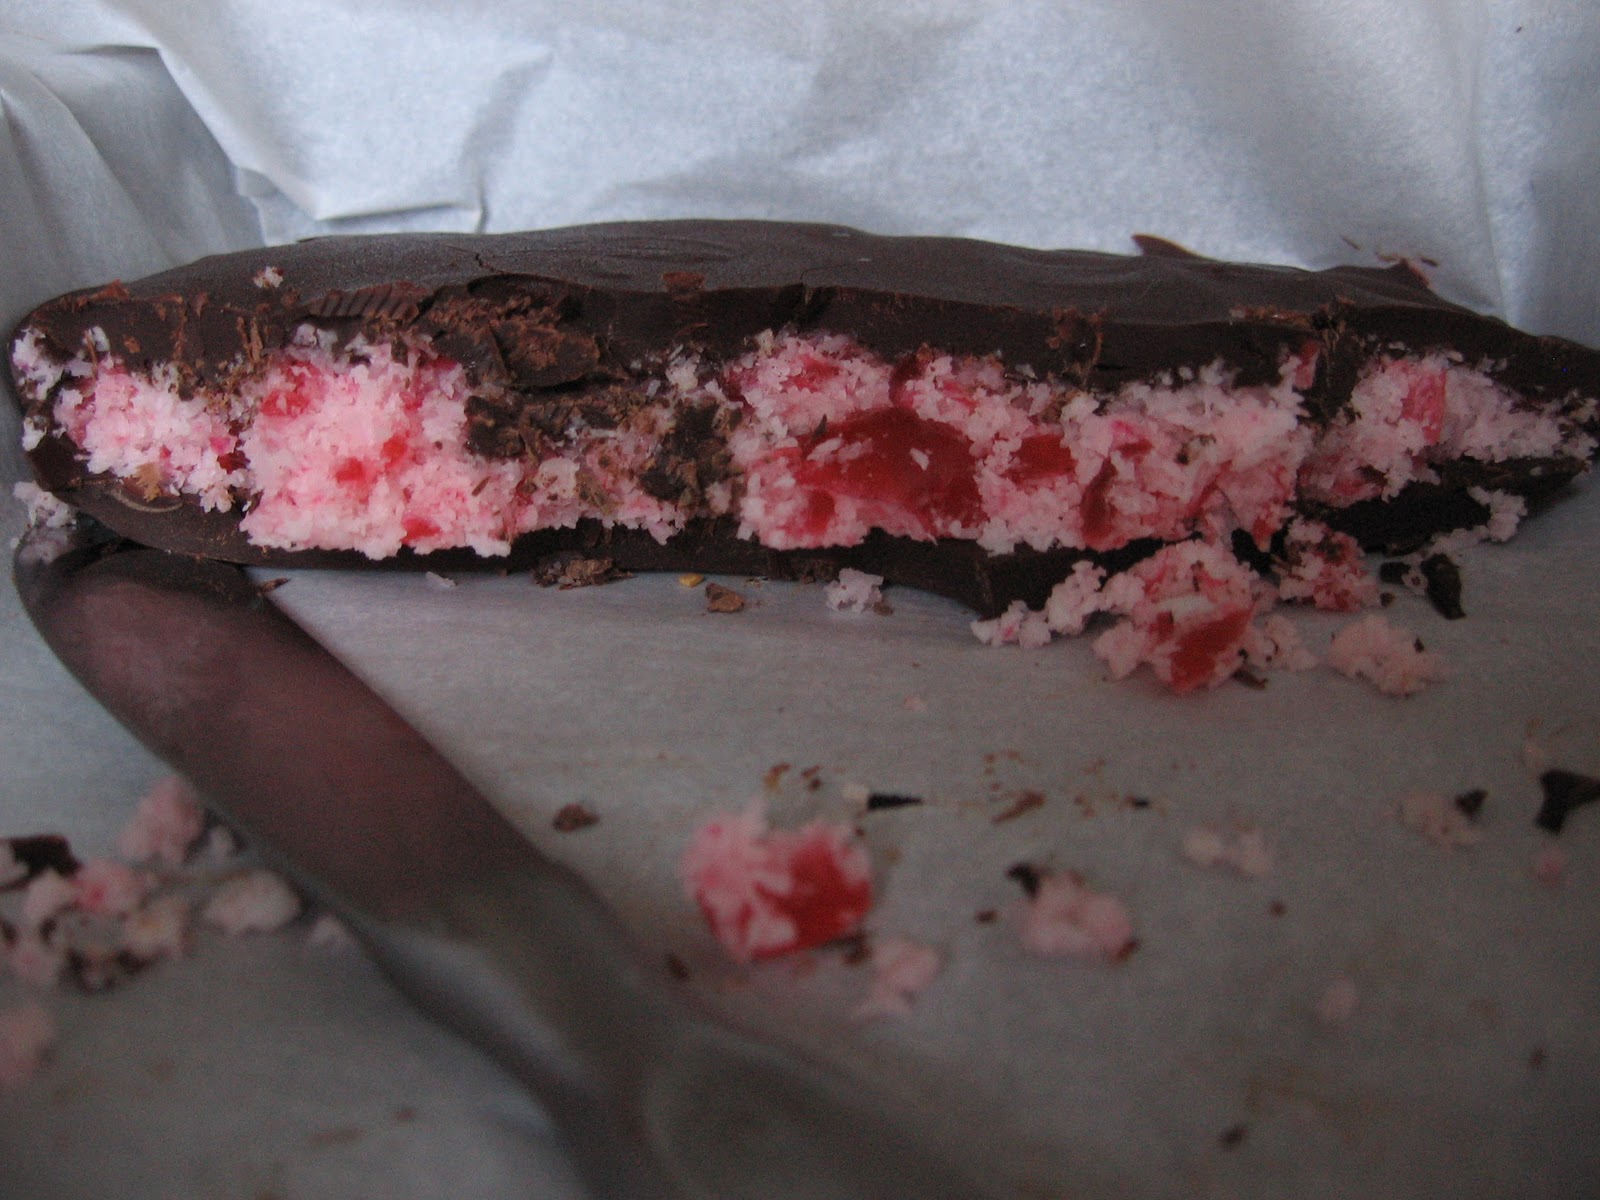
Delicious, it tastes great! My craving is satisfied and everyone liked it. I was very pleased with the result. It just needs a bit of tweaking to make it more friendly to cut.

Comments and what I would do different:
I would add some more cherries. Because of the chocolate base, this slice is difficult to cut, and falls apart, although it tastes great! Next time I might make them in ice cube trays or cupcake cases. Put some chocolate in first as the base, then the cherry, coconut layer and then a drizzle of chocolate. Once set then pop them out. I would hope then they would keep their form.

Monday, 6 June 2011

Chocolate Mousse (Slice)


Chocolate Mousse (Slice)

Inspired by:
A recipe posted on the Nigella website by someone in the community. I have looked for it and can’t find it anymore.
The idea of Mousse cake- it sounds easy to eat and delicious
Brownie recipe- Family Circle Cookbook for Kids

Why?
I have tried the chocolate mousse before and it is fabulous. My husband always eats chocolate mousse for dessert whenever we go out for dinner, so I was bound to make it again soon! I decided on trying it as a slice because I wanted to see if it could taste almost like a rich chocolate cheesecake, or have the texture of one, or just make chocolate mousse easier to eat with your fingers!

I used:
Base:
100g dairy free margarine (melted)
1 cup gluten free self raising flour
1 cup brown sugar
½ cup cocoa
1 Tsp powdered vanilla /essence

Mousse:
200g dark chocolate- dairy free
6 egg whites (from fresh eggs)
3 egg yolks (from fresh eggs)
A pinch of salt

What I did:
Preheat oven to 180C, and grease/line 20cmx30cm tray.
For the base, combine sugar, flour, cocoa and vanilla in a bowl and gradually add margarine. 
Mix until well combined, the mixture may be quite grainy. 
Press mixture firmly into tin and bake for 15-20 mins (I baked for 20 mins and the base was a bit hard, maybe bake less or add a touch more margerine?). 
Take out of the oven to cool.

For the Mousse:
Crack open the eggs and separate the whites from the yolks, keeping three yolks in one bowl/container, and all the whites in another. (You can use the other 3 yolks in another recipe.)
Now it is time to whisk the egg whites and salt until they are snow white and form stiff peaks.
If you have an electric mixer use the whisk attachment. It is also very possible, although a good work out, with a hand whisk (I made my first batch with a hand whisk-whisking is in the wrist) or hand beater. 
This batch I did with the hand beater and it took me between 5 and 10 minutes to get the whites right.
Once you have whisked the egg whites and salt set it aside in a cool place.
Melt the chocolate in a double boiler/bain- marie and take off the heat.
Mix the 3 egg yolks into the melted chocolate and set aside to cool for 5 minutes.
Using a wooden spoon, mix a tablespoons worth of egg whites into the chocolate mixture, as you mix in the egg whites take care to stir in the same direction. 
Slowly add the rest of the egg whites, bit by bit. 
Once it is all combined, pour into serving dishes of your choice and place in the refrigerator until set. (5 hours?)

Comments after eating Chocolate Mousse (Slice)
Delightful. Our guests loved it too. At first the base was a bit too hard as I had overcooked it, or had not got the ingredient ratios right for a brownie biscuit. But a few days in the fridge and the base softened quite well. It's a big chocolate hit, but as a slice you can eat it in little bites over several days. After about 6 days the mousse separates from the base when you cut it. This would taste great with a mint flavoured mousse!


Friday, 27 May 2011

Honeycomb, which turned into Honeycomb and chocolate slice!


Honeycomb and Honeycomb and chocolate slice


Inspired by:
Browsing my saved favourites on the computer which had a recipe on honeycomb
Honeycomb with golden syrup- allrecipes.com.au
Chocolate caramel slice- taste.com.au
Chocolate mint slice- ninemsn.com.au Australian Women’s Weekly.

Why?
Honeycomb is my Achilles heel. I love the stuff and I have never been able to make a successful batch. I either burn it, undercook it, or put in too much bicarb soda. I keep trying, thinking that somehow without a cooking thermometer, I will be able to find the right sign that tells me it is ready. I was going to try with corn syrup this time, but it was too difficult to find. A small amount of questioning from my husband spurred me to try it with golden syrup one last time. I just can’t resist!

I used:
Honeycomb
4 Tbs golden syrup
1 Tbs water
1 cup castor sugar
3 tps bicarbonate of soda

Slice base
1 cup gluten free flour
½ cup brown sugar
½ cup desiccated coconut
125g margarine –melted (dairy free)

Chocolate layer
110g chocolate (dairy free)
½ Tps vegetable oil

What I did:
Grease/line 20cmx 30cm tin. (I recommend baking paper for honeycomb).
In a large saucepan, mix water, sugar and syrup until well combined.
Stop stirring and place on heat, bringing mixture to the boil.  
Reduce to low heat and simmer for 5-10 minutes, or until a drop of the mixture hardens in water, take care that it does not burn. 
When the mixture is ready, take off heat (turn off stove), and quickly add bicarb soda, stirring until it is mixed through. 
When added it should make the syrup foam up instantly. 
Pour the mixture into the lined tin and leave to set. 
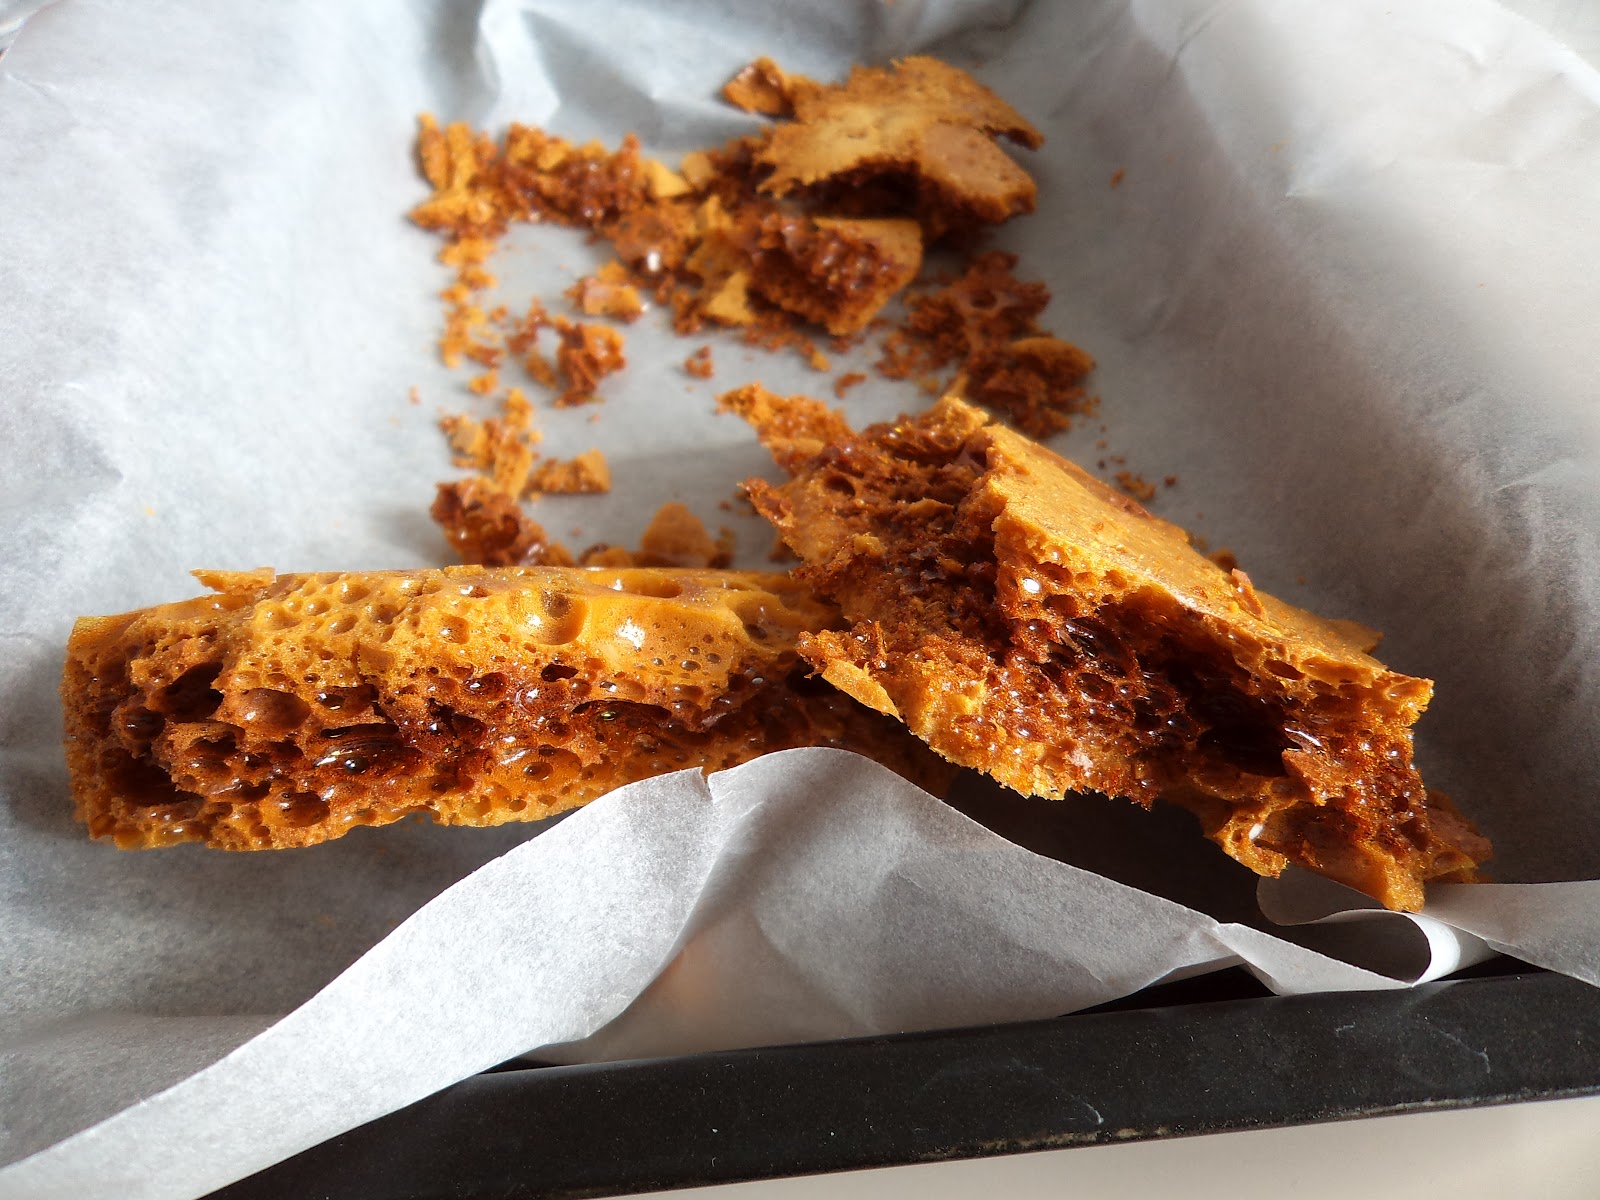
Once set, break into pieces and enjoy! (Photo of my later successful attempt is above).

(If you are like me and were a bit trigger happy! Your honeycomb may not have set into the crunchy delight you anticipated! It still tastes delicious, but it is a bit too gooey for eating by itself! Solution! Honeycomb slice!)

Preheat oven to 180C. Grease/line the same, or same size 20cm tin (otherwise your slice and filling will be two different sizes!).
In a bowl combine gluten free flour, sugar, coconut, and melted dairy free margarine until it forms a dough like mixture. 
Spread mixture evenly out, pressing it into the tray. Bake for 15 mins or until golden brown.

Once the slice base is cool, start to peel the honeycomb off its baking paper and onto the top of the slice base. 
Press the honeycomb and base together, like a sandwich, for easier removal of the paper. 
Tidy the edges of the honeycomb into the base of the slice, or trim them off to eat.
Melt chocolate (I use a double boiler for this) and add oil. 
Pour over the top of the honeycomb, to complete the slice.
Leave to set (I didn’t refrigerate as everyone advises not to refrigerate honeycomb).

Comments after eating Honeycomb chocolate slice!
Um. . .I want to eat more! Very yummie! A bit like a crunchie bar, for all those people who know what that is! Very delicious, and very moreish.

Photos are: 
Honeycomb just as I had poured it in
Honeycomb just as I had put it in the base
Honeycomb and chocolate slice. . .cut and ready to eat!