Showing posts with label Egg Free. Show all posts

Thursday, 1 November 2012

Virgin Mojitos


Virgin Mojitos

Inspired by:
I can’t find the recipe anymore! I didn’t even write it down!
Apologies if my directions are rough.

Why?
I felt like having a Mojito but am off alcohol at the moment.

Time Taken:
5 minutes

Number of Dirty Dishes:
Spoon, knife, chopping board, 2 drinking glasses

I used: (2 skinny glasses)
4-6 tbs Lemon cordial chilled
(equal parts lemon juice, castor sugar and water, boiled until sugar has dissolved)
2 limes
10 mint leaves
2 tbs raw sugar
Cold water (still or sparkling)

What I did:
Cut limes into quarters and squeeze half a lime into the bottom of each glass.
Add 1tbs of raw sugar and 5 mint leaves to each glass.
With the spoon mix thoroughly, making sure the flavours muddle.
Then add the squeezed half lime and 2tbs of lemon cordial.
Mix again and add the other half of the limes and fill glass with cold water.
Serve!

Comments after drinking the Virgin Mojito:
YUM! I want to make another one! (and I did!)

What I would do different:
Muddle more, and maybe add some more lemon cordial.

Monday, 22 October 2012

Melting Moments


Melting moments


Inspired by:
Taste.com.au

Why?
I haven’t eaten one in what feels like years!

Time Taken:
15mins+15mins+5mins=35 mins

Number of Dirty Dishes:
Biscuit tray, medium bowl, fork, measuring cups, table knife, small bowl

I used:
250g dairy free margarine, cubed
1/3 cup gluten free icing sugar
1t vanilla
1 1/3 cups gluten free flour
1/3 cup gluten free corn flour.

Icing
60g dairy free margarine at room temperature
1t vanilla
Lemon rind to taste
2/3 cup gluten free icing sugar

What I did:
Preheat oven to 160C and line biscuit tray with baking paper.
In a medium sized bowl beat dairy free margarine, sugar and vanilla until pale and creamy.
Add flours and mix until biscuit dough is just combined.
Roll into balls (the bigger the ball the bigger the biscuit) and place on tray 5cm apart (they do spread). Flatten slightly with a fork. Bake 15 minutes. Take out of oven and leave to cool (they will solidify more). Once cool, mix the icing ingredients together in a small bowl. Using a table knife cover the base of the biscuit in icing and press the base of another biscuit on the top. Repeat until all biscuits are iced. Eat and enjoy!

Comments after eating Melting Moments:
They really do melt in your mouth! Delicious and dangerously moreish! Although they are not so tidy to look at. Once iced they look a bit more respectable, but once you taste them the look of them does't matter so much!

What I would do different:
Make a bigger batch! Also experiment with a little less margarine in the hope that they would spread less. 

Friday, 30 September 2011

Muesli Slice


Muesli Slice

Inspired by:
Golden Circle Kids Cookery Book Anzac biscuit Recipe

Why?
Some visitors left some non gluten free muesli and some dairy butter at our house and I didn’t want to waste them. As well as making this for the gluten and dairy tolerant friends and family around, I wanted to make some for me too!

I used:
1 cup gluten free muesli (of your choice, I used oat muesli because its allowed in my gluten free diet. I know oats aren't permissable for some)
1 cup desiccated coconut
¾ cup sugar
½ cup gluten free self raising flour
100g dairy free margarine OR 1/4 cup + 1 Tbs vegatable oil.
2 Tbs golden syrup


What I did:
Preheat oven to 160C, and line 20x30cm tray.
In a medium sized bowl combine gluten free muesli, coconut, sugar, and gluten free self raising flour and mix well with a wooden spoon, and set aside. 
In a small saucepan over low heat melt dairy free margarine or oil and golden syrup together. 
Once melted take off heat (turn off stove) and pour the margarine and syrup mixture over the muesli mixture. Mix thoroughly. 
Pour the mixture onto the tray when it is thoroughly combined. 
Press into the tray, making sure there is an even spread of mixture. 
Bake in the oven for 20-30 minutes or until golden brown on top. 
The mixture may still be bubbling when it has browned and is cooked, but will set when it is cooling.

Comments after eating Muesli slice!
It is tasty, but probably has too much margerine and sugar in it to be too healthy! It's very filling, which is a bonus! And lasts for quite a while! If you are using oil it will end up being a bit crunchier than if using margerine. Random tip-I find it's much easier to break into pieces than to cut!


Tuesday, 19 April 2011

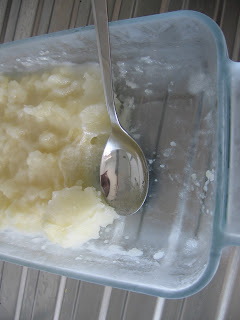
Pear Sorbet


Inspired by:
Jamie Oliver’s Pear Sorbet Recipe

Why?
There was a can of halved peaches left in the cupboard which had been purchased by a family we had staying with us a few weeks ago. The weather is becoming quite warm now, so it is definitely the season for it, and really of all the recipes that involved pear, this seemed the most appealing one to play with.
 
I used:
1 cup caster sugar/white sugar
1 cup water (approx 200ml)
1 can of halved pears in juice 
(411g -I think the can label read that just over half of the weight was syrup, but my Italian is not that good yet to be certain.)
1 sachet of Vanilla (powder)

What I did:
In a saucepan, combine the sugar and water. 
Put it on the stove, fire up the element and bring the sugary syrup to the boil.
Boil for 3 minutes and add the pears and their syrup, boil for another 5 minutes, or less if you think they are soft enough to mush/squish. 
Take the saucepan off the heat (turn off stove too of course) and working carefully to avoid any splashes, puree the pears with a fork.
If you have a blender, using it to blend the mixture may be a much easier option than the fork method, (although it might involve more washing up). 
Once the pears have been pureed to your satisfaction, add the vanilla and stir. 
Pour into a heat proof bowl or container to cool. 
Once cool enough, place in the freezer to set. 
Best practice is to stir the sorbet a couple of times to help with the setting process. 
Check on the sorbet once an hour and stir through any frozen parts which have formed around the edges of the dish. 
Once it is set, eat and enjoy! 
Enough for six people,  or you can do the maths on the other options.


This one took about 4 hours until it was nearly set (and then I went to bed). I think freezing time also depends on the temperature and quality of your freezer. If you have an ice cream maker, you may be able to use this to set the sorbet, I however have no experience with these things. I do remember that everyone who refers to the machines in recipes will always remind readers that they will have to check the manufacturers instructions, as if it was a real danger that a consumer might accidentally put the wrong setting on their pear sorbet and they might get a smoothie from the machine instead *Shrugs* I guess those lucky ice cream maker owners will have to read the manufacturers instructions to find out!

Ps. Ice cream is my favourite food, of course I’m secretly jealous of you ice cream maker owners!

Comments after eating Pear Sorbet:
Delish! And surprised. . .I think I’m going to be making sorbet and ice cream every week. I didn’t realize how easy it was! Although it does melt faster than store bought sorbet- which is to be expected, I think smaller portions mean it won’t melt before it is eaten, or freezing it in individual serves so the serving dish keeps it cold would be ways around this!

 Next time I will remember to take the picture the way I want it to appear on my post so it doesn't get spun around. My apologies.

Enjoy

L xoxo